I had a ton of fun making these two little books. There are many tutorials out there on how to make mini/micro books, but none that included how to stitch the signatures. Most of the others created binding out of gluing together a bunch of folded pages. However, I wanted to make a book as true to form and durable as possible, so I went with a good, old fashioned, stitched set of signatures.
What you will need:
1. Very thin paper sheets (Steps 2, 3 & 4)
- I used white origami paper. It folds nicely and due to its thinness, I was able to make many pages.
2. Stiffish paper for the binding, spine inlay & endpapers. Some of this will be seen. (Steps 8, 9 & 10)
- I used a scrapbooking background paper with a nice pink floral pattern.
3. Thin cardboard, 1.2 mm - 1.4 mm thick (Step 10)
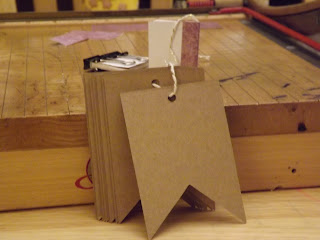
- I used some stiff gift tags
4. Material for your cover (Steps 11 & 12)
- I used fabric, but only because I couldn't find a thin enough bit of leather
5. Needle and thread (Steps 4, 5, 6 & 7)
-Color is not relevant as you will not see it in the finished product. I used simple white thread off a spool.
6. Very small binder clips, at least 2 (Almost every step)
-These are absolutely necessary. It is highly unlikely that your books will stay together without these.
7. PVA Glue & something to spread it with; your finger is a good option. (Steps 8-11, & 13)
8. Ruler (Almost every step)
9. Cutting tools
-Specifically scissors, and a paper cutter if you can get it or whatever you need to help you cut your pages super straight. A ruler and exacto knife could work.
10. Very thin ribbon or thread for bookmark, if desired. (Step 9)
Step 1
Gather your materials and plan out your book.
 Decide the size and thickness of your book. I made my pages 1.5 x 1 inches. I couldn't decide between a black cover or a white cover (I found material that I loved in both black and white), so I made both. These books also have approximately 76 pages each, which made the spine approx. 1/4 inch thick.
I also wanted to include a bookmark inside, and a chain around the outside, so this is where I planned that out, as well.
Step 2
Cut out & fold your pages.
 |
| A group of 5 signatures, each 16 pages long, made from 4 pieces of paper |
Note: the first page of your first signature and last page of your last signature will not be visible in the finished book.
I had already decided that I wanted
my finished book to be 1.5 inches tall by 1 inch wide. This means that I
needed to cut out sheets that would be 1.5" x 2", as they were to be
folded in half to create the pages and signatures.
Again, do whatever you need to to get these sheets as straight as possible and as uniform as possible when you cut. The straighter and more uniform the cut, the better the book will look.
Quick Terminology
Signature: In printing, a signature is a group of pages bound together.
Fore edge: the side of the book that opens, opposite the spine.
Step 3
Assemble your signatures by nesting your cut and folded sheets.
Each piece of folded paper, or sheet of paper, represents four pages. Take your folded sheets and nest them inside each other to make signatures. Be careful not to make them too big, and make all your signatures the same number of pages.
 |
| 6 holes in the spine, each 1/8 inch apart |
You will also likely notice that your pages do not line up on the fore edge (the side opposite the spine). Don't worry about it for now. It will actually make it easier to flip through the pages if you leave it - some professionally published books do - but you can trim it off after the stitching if you'd like.
Step 4
Measure, Mark and Drill Signatures for Stitching
 |
| Drill holes with the needle from inside the Signature |
You will need six holes in each of your signatures. It is easier to mark them if you keep them the same distance apart. Decide how far apart you want your holes, and how far from either the top or bottom of the book you will start them.
 |
| Single Signature with Holes |
Once you are sure of your measurements, make certain your signature is lined up, and drill holes from the center page out, through the entire signature at once.
 |
| There is more space on the bottom than top, but each is the same. |
Repeat with all your signatures, making sure that the holes line up with each other on each signature.
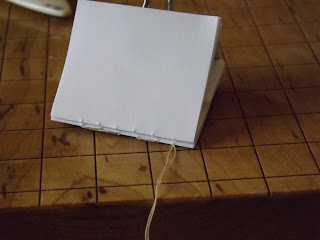
Take a moment to use a binder clip and put your freshly drilled signatures together on the fore edge to see if your book's spine is as thick as you'd like it. Add more signatures if desired.
 |
| This is where I started to really get excited. |
Step 5
Stitch your first signature
 |
| This picture is pretty, and the thread is pretty long. |
This part can be a bit tricky. It is also very important, so be sure to take the time to do it right.
Begin by cutting a fairly long bit of thread. My thread for this book was probably two feet.
Fold the thread in half, and thread the needle with the cut ends. Or, thread the needle on the folded middle and run the needle down the threads to near the cut ends.
 |
| No knots here. Just thread the needle through the end loop. |
Open your first signature and attach the binder clip to one end of the sheets. This is important as you pages will slide around and drive you crazy if you don't. Also, your stitching will not be as tight and will weaken your bindery overall.
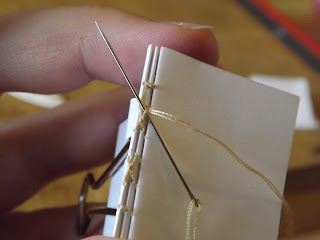
Beginning on the OUTSIDE/SPINE of your signature, run the thread through the TOP hole, leaving a loop at the end. Send the needle through the next hole, from the INSIDE, and thread it through the loop.
Stitch a very simple IN and OUT pattern through the remaining holes. You should end up with your thread hanging out the SPINE side of the signature in the 6th and BOTTOM hole. Do NOT cut the thread.
Step 6
Stitch your Next Signature, Attaching it to the First.
Lay your next signature atop the stitched signature and line up your holes. Move the binder clip to hold all of Signature 1, and half of Signature 2. |
| It's coming together! Literally! |
Run your needle and thread from the OUTSIDE/SPINE of Signature 2, through the bottom hole, toward the INSIDE. Pull tight. You won't be able to pull tight without your binder clip holding everything steady.
Sounds simple, so let's mix it up a bit here.
 |
| Tie a knot between Signatures 1 & 2 |
Run your needle through the next hole up, from the inside out. Once your needle is out the spine, run it under the thread on the same hole in Signature one, and tie a simple knot, pulling everything tight.
 |
| Simple knot, nothing fancy. |
 |
| Back in again! |
Step 7
Stitch your Next Signature
 |
| Knotty, knotty... |
Lay your next signature atop the stitched signatures and line up your holes. Move the binder clip to hold all of your previous signatures and half of your current one.
Place your first stitch from the Spine toward the interior. Come back toward the spine on the next one down, knotting in the stitch from the previous signature.
 |
| Don't forget to stitch together the ends! |
Repeat for the remaining holes. When you reach the last hole, remember to tie it to the previous signatures before moving on.
 |
| Five signatures total. |
Repeat step 7 ad naseum, or until you've added all the signatures you want. Remember to use your binder clip and keep things tight!
 |
| We're starting to look like a real book here! |
Knot off your thread well and cut the excess.
Step 8
Cut and Attach Endpapers to Signatures
Using your lovely, stiff paper, you will cut out some endpapers. These papers will be seen on the inside cover of your book and before the first page and after the last page. Again, I used scrapbooking paper for this because I wanted it to be pretty.
 |
| Some part of me is always sad they're not green. |
Glue an endpage to the front and one to the back of your bound set of signatures with the fold in line with your book's spine. Be careful that the glue doesn't squeeze out and get all over your pages. Put the binder clips on both the spine and fore edge until the glue has set. Remove spine side binder clip for the next step.
Step 9
Cut and Attach Spine Backing (& Bookmark if Desired)
With your totally awesomely stitched signatures secured tightly in your binder clip, measure the width of your spine. Now add about 1/2 inch to that.
 |
| Scored and folded. Don't forget the binder clip! |
Next, make two folds in the center of your backing, so that the distance between the folds is slightly larger than your spine width. Slightly larger being about the-thickness-of-the-backing-paper larger.
Because I used scrapbook paper, my backing would not fold cleanly. I wound up using an exacto knife to score one side of the paper and get a good fold.
-- If you want a bookmark, now is the time.
Cut a piece of ribbon or string to your desired length. Place it between the signature binding and backing paper during the next step. ---
 |
| Inlay and bookmark glued, use the binder clips for 10 minutes. |
Place the signature spine between the folds of the backing paper in the glue. Bend the backing and glue to the sides of your book. Quickly put another binder clip on the spine backing paper! Now leave it alone for at least 10 minutes. Stretch, get a snack, whatever, just don't open it too soon. :)
Step 10
Measure and Cut Spine Inlay and Case
 |
| When you can't find what you need it's time to get creative. |
Making certain that your comers are a solid 90 degree angle, cut two identical pieces of the cardboard to your desired book size. I strongly suggest making them the same size as your bound signatures. The cover wrapping will make the finished cover just larger than your book interior.
 |
| Measured and marked, ready to cut. |
Next, cut out the spine inlay from your stiff paper. This should be the same height as your book, and twice the current width of your spine. If the spine inlay is not wide enough your book will not close properly.
Remember that your spine is wider now than it was when you measured it for the backing paper.
 |
| Ready for the last couple steps! |
Step 11
Assemble the Cover
This is a good time to test your cover material's ability to hold glue, especially if it is fabric. The fabric I purchased oozed glue through it, and the beautiful pattern on the black cloth was obscured. I ended up folding it in half and the glue from the boards was enough to hold it in place.
 |
| Folded cloth, ready to be made into a cover. |
 |
| Rough cut material with boards and inlay, ready to glue |
Next, spread a nice, even layer of glue on your spine inlay, and glue it, straight as possible, onto the wrap material. Likewise, glue the cover boards to either side of the spine inlay.
It is important here to make sure everything lines up very nice and straight. There is no need to overlap your inlay and cover boards.
 |
| Trimmed wrap with glued Spine Inlay and cover boards |
Pressing with something heavy while the glue dries is a good idea at this point, though not strictly necessary.
Once the glue on your boards, spine and wrap are dry, trim down your wrap material, leaving about 1/8 inch or so on each side. You want enough material from your wrap to hold securely to the inside of your cover.
 |
| Cut out small triangle sin corners, leaving 2mm space uncut |
Cut the corners as shown in the picture to the right, leaving about 2 mm of uncut cloth around each side.
Warning: Do not cut all the way to the cardboard! If you cut all the way to the cardboard it will show through after wrapping.
Step 11
 |
| Glue in the corners of the wrap |
Wrap the Cover
We're almost finished! Time to wrap the cover.
Fold the corners of your wrap material over the corners of your cover boards and glue them.
 |
| Glue in the edges. |
Now, glue in the edges of your wrap.
 |
| Almost ready for final assembly! |
Step 12
 |
| Curve the spine. |
Curve the spine
This is a very simple but very important step.
Bend your spine inlay over something round, such as a pencil or straw. Lacking these, just try to bend it so it is nicely curved or rolled.
If you skip this step your book will not open nicely once assembled.
Step 13
 |
| Awaiting the glue |
Final Step - Attaching the Cover
We made it to the final step! A few warnings before we begin.
- Be careful! This step is crucial to the finished look of your book, and you won't get a second chance
- Use the binder clips after gluing! It is imperative that after gluing, the binder clips are attached on both the fore edge and spine and left there for at least 10 minutes while the glue sets. Otherwise your cover will not sit straight on the book.

- Line up your cover with the spine of the book! The boards from your wrapped cover should line up exactly with the spine of your bound pages. the Spine Inlay should not touch your pages at all. Be precise.
Once you're sure you've got these thing ready, spread glue evenly on the inner part of your front cover and press the outer side of your endpaper to it. The line of the spine must line up with the line of the cover board.
Put the binder clips on and wait at least 5 minutes before repeating the process for the back cover. make sure to line up the spine with the cover board. Put the clips on and wait for 10 minutes before playing with it. This will essentially 'close' your book.
Note: The spine inlay get no glue. There should be space between the spine inlay and the spine.
Post- Assembly Check
Your book is now finished! You only need to check to make sure it works properly. Your cover should open and close easily and smoothly. There should be no tugging or tension on the spine. When open the spine inlay should make a lovely little semi-circle.Congratulations! You made a book!
If it didn't turn out, learn from your mistakes and then try, try again!
 |
| While generally bad for a book, this is a good test of the spine. |
 |
| A nice little rounded spine. |
 |
| A matched pair |
 |
| The mess it all left. |
 |
| I added the chain by drilling a hole in the spine with the needle. |
 |
| I threaded a ring through the hole and attached the chain. |
 |
| The various decorations were then added to the ring and chain. |
 |
| Cute set of valentine's gifts :) |


awesome! what got you into this?
ReplyDelete